Difference between revisions of "Software Configuration/ja"
(Updating to match new version of source page) |
|||
| (29 intermediate revisions by one other user not shown) | |||
| Line 1: | Line 1: | ||
{{DISPLAYTITLE:First Software Configuration|NOERROR}} | {{DISPLAYTITLE:First Software Configuration|NOERROR}} | ||
| − | + | ソフトウェアのインストール後にはじめて起動すると、1Clickソフトウェア構成が表示されます。この初期構成はガイドに従って行われます。この構成を行うことで、すぐにスキャンを実行し、ファイルを送信できるようになります。 | |
=構成ファイルの設定= | =構成ファイルの設定= | ||
| − | + | このプロセスの最初のステップでは、スキャナーの構成ファイルを設定します。構成ファイルにはユーザーが使用するスキャナーのさまざまなコンポーネントに関するすべての情報が含まれるため、システムが正常に動作するにはこの設定が必須です。 | |
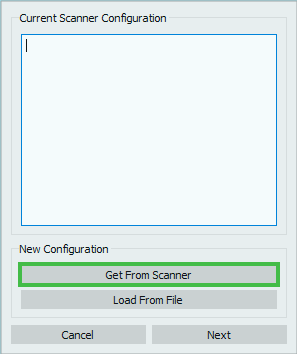
[[File:LoadConf.PNG]] | [[File:LoadConf.PNG]] | ||
| − | + | 設定するには、スキャナーが正しく接続されていて、電源が入っていることを確認してから、'''Get From Scanner'''(スキャナーから取得)ボタンを押すと、自動的にロードされます。 | |
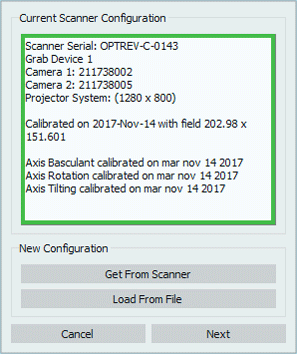
[[File:LoadedConf.PNG]] | [[File:LoadedConf.PNG]] | ||
| Line 17: | Line 17: | ||
*スキャナーのコンポーネント | *スキャナーのコンポーネント | ||
| − | + | ''Load From File''(ファイルからロード)ボタンを使って、外部ファイルから構成をロードすることも可能ですが、この操作が必要になるのは非常に希なケースです(オープンテクノロジー社側でスキャナーの構成ファイルを編集する必要があり、内部ファイルが有効でなくなった場合など)。 | |
| − | + | ダイアログでNextボタンをクリックし、構成を進めます。中止する場合は、Cancelボタンをクリックします。 | |
| − | = | + | =システムのキャリブレーション= |
| − | + | 以下の手順でシステムのキャリブレーションを実行します。光学ヘッドをキャリブレーションしてから、駆動システムのキャリブレーションを行います。 | |
| − | === | + | ===ヘッドのリキャリブレーション=== |
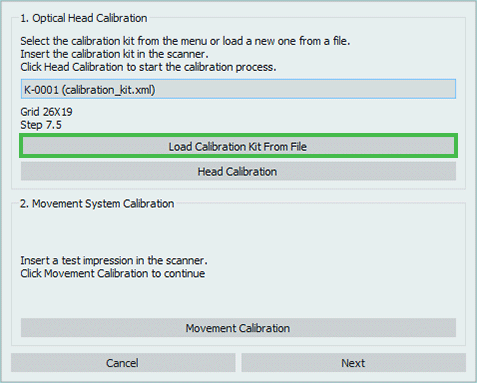
| − | + | 実行するには、キャリブレーションキットの.xmlファイルをロードする必要があります。ロードするには、'''Load Calibration Kit from File'''(ファイルからキャリブレーションキットをロード)ボタンをクリックします。 | |
[[File:LoadCal.PNG]] | [[File:LoadCal.PNG]] | ||
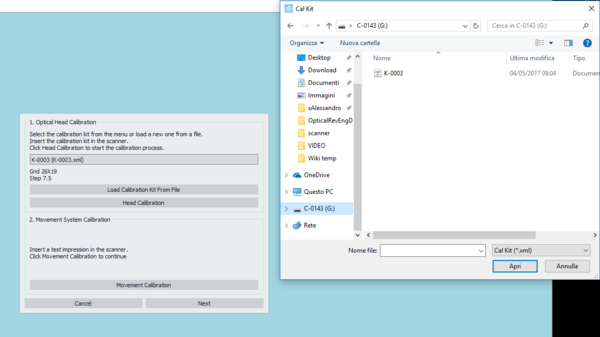
| − | + | この.xmlファイルはスキャナーの内部メモリにあり、コンピュータではUSBメモリを挿入したときと同じように認識されます。 | |
[[File:CalKitLocation.PNG]] | [[File:CalKitLocation.PNG]] | ||
| − | ''' | + | '''注意:ファイルの番号と、付属品ボックスに入っているプレートの番号が一致していることを確認して下さい。一致していない場合は、キャリブレーションを実行する前に販売業者にご連絡下さい。''' |
| − | + | キャリブレーションプレートをスキャナーに入れるには、プレートの背面にある黒いサポート部分を取り外します(マグネットで固定されています)。 | |
[[File:Master-click.jpg]] | [[File:Master-click.jpg]] | ||
| − | + | インプレッションホルダーの2つのネジを緩めて、マスターサポートを入れ、できるだけネジをしっかりと締めて固定します。 | |
[[File:supporto-master.png]] | [[File:supporto-master.png]] | ||
| − | + | キャリブレーションプレートをスキャナーに置きます。この際、太字の丸が1つある側を左に、2つある側を右側にします。 | |
[[File:MasterinScanner.png]] | [[File:MasterinScanner.png]] | ||
| − | + | '''Head Calibration'''(ヘッドのキャリブレーション)をクリックして、キャリブレーションを開始します。 | |
| − | === | + | ===駆動システムのキャリブレーション=== |
| − | + | 駆動システムのキャリブレーションを行うには、画像に表示されている通り印象をスキャナーに入れ、'''Movement Calibration'''(駆動システムのキャリブレーション)をクリックします。 | |
[[File:MovCal.PNG]] | [[File:MovCal.PNG]] | ||
| − | + | ダイアログでNextボタンをクリックし、構成を進めます。中止する場合は、Cancelボタンをクリックします。 | |
| − | = | + | =トリミングの設定= |
| − | + | このステップでは、''scan height''(スキャンの高さ)面より下にあるすべての情報を自動的に消去する、自動トリミングを設定できます。 | |
| − | + | ダイアログのバーのスライダを動かしてスキャンの高さを変更します。印象の重要な部分に重ならないよう十分注意して下さい。 | |
[[File:Trimming.png]] | [[File:Trimming.png]] | ||
| − | + | Then, if the Triple Impression Module is enabled in your license, click on the second tab ''Triple'' and move the sliders to establish the cut planes to separate the elements (upper from lower and individual from bite) | |
| + | |||
| + | [[File:TripleTrimming.png]] | ||
| + | |||
| + | ダイアログのNextをクリックして、最初の構成プロセスを終了します。 | ||
| + | |||
| + | ==Access Calibration after first Configuration== | ||
| + | |||
| + | Should it be needed, it is possible to repeat the calibration even after the first configuration of the system simply by accessing the options in the welcome page using the '''Option Button''' {{Inline button|Optionbutton.PNG}}.<br/> | ||
| + | In the first Option Page, General, simply click '''Restart Scanner Configuration''' to restart the calibration procedure. | ||
| + | |||
| + | [[File:RestartConf.png]] | ||
{{Navigation|1Click_Intro|Options_Panel}} | {{Navigation|1Click_Intro|Options_Panel}} | ||
Latest revision as of 14:33, 15 December 2017
ソフトウェアのインストール後にはじめて起動すると、1Clickソフトウェア構成が表示されます。この初期構成はガイドに従って行われます。この構成を行うことで、すぐにスキャンを実行し、ファイルを送信できるようになります。
Contents
構成ファイルの設定
このプロセスの最初のステップでは、スキャナーの構成ファイルを設定します。構成ファイルにはユーザーが使用するスキャナーのさまざまなコンポーネントに関するすべての情報が含まれるため、システムが正常に動作するにはこの設定が必須です。
設定するには、スキャナーが正しく接続されていて、電源が入っていることを確認してから、Get From Scanner(スキャナーから取得)ボタンを押すと、自動的にロードされます。
ファイルが正常にロードされると、ボックス内に以下が表示されます。
- スキャナーのシリアル番号
- スキャナーのコンポーネント
Load From File(ファイルからロード)ボタンを使って、外部ファイルから構成をロードすることも可能ですが、この操作が必要になるのは非常に希なケースです(オープンテクノロジー社側でスキャナーの構成ファイルを編集する必要があり、内部ファイルが有効でなくなった場合など)。
ダイアログでNextボタンをクリックし、構成を進めます。中止する場合は、Cancelボタンをクリックします。
システムのキャリブレーション
以下の手順でシステムのキャリブレーションを実行します。光学ヘッドをキャリブレーションしてから、駆動システムのキャリブレーションを行います。
ヘッドのリキャリブレーション
実行するには、キャリブレーションキットの.xmlファイルをロードする必要があります。ロードするには、Load Calibration Kit from File(ファイルからキャリブレーションキットをロード)ボタンをクリックします。
この.xmlファイルはスキャナーの内部メモリにあり、コンピュータではUSBメモリを挿入したときと同じように認識されます。
注意:ファイルの番号と、付属品ボックスに入っているプレートの番号が一致していることを確認して下さい。一致していない場合は、キャリブレーションを実行する前に販売業者にご連絡下さい。
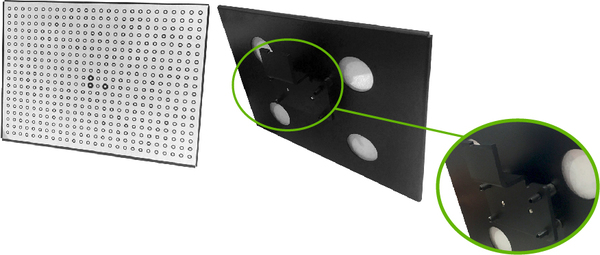
キャリブレーションプレートをスキャナーに入れるには、プレートの背面にある黒いサポート部分を取り外します(マグネットで固定されています)。
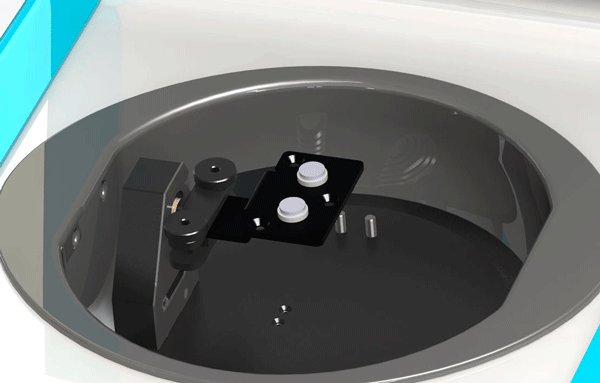
インプレッションホルダーの2つのネジを緩めて、マスターサポートを入れ、できるだけネジをしっかりと締めて固定します。
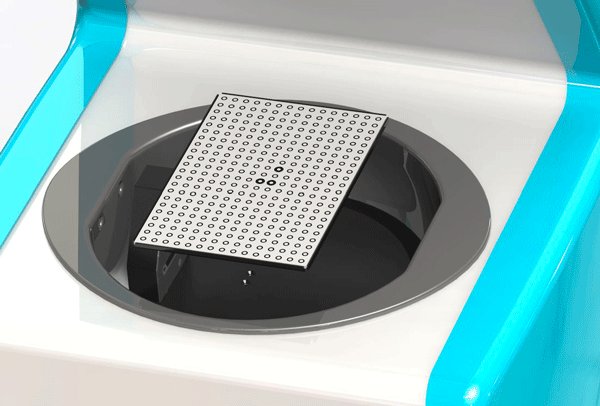
キャリブレーションプレートをスキャナーに置きます。この際、太字の丸が1つある側を左に、2つある側を右側にします。
Head Calibration(ヘッドのキャリブレーション)をクリックして、キャリブレーションを開始します。
駆動システムのキャリブレーション
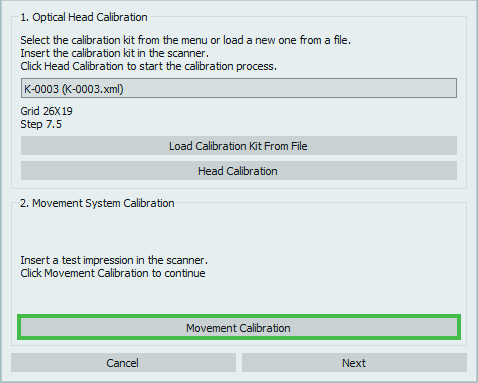
駆動システムのキャリブレーションを行うには、画像に表示されている通り印象をスキャナーに入れ、Movement Calibration(駆動システムのキャリブレーション)をクリックします。
ダイアログでNextボタンをクリックし、構成を進めます。中止する場合は、Cancelボタンをクリックします。
トリミングの設定
このステップでは、scan height(スキャンの高さ)面より下にあるすべての情報を自動的に消去する、自動トリミングを設定できます。
ダイアログのバーのスライダを動かしてスキャンの高さを変更します。印象の重要な部分に重ならないよう十分注意して下さい。
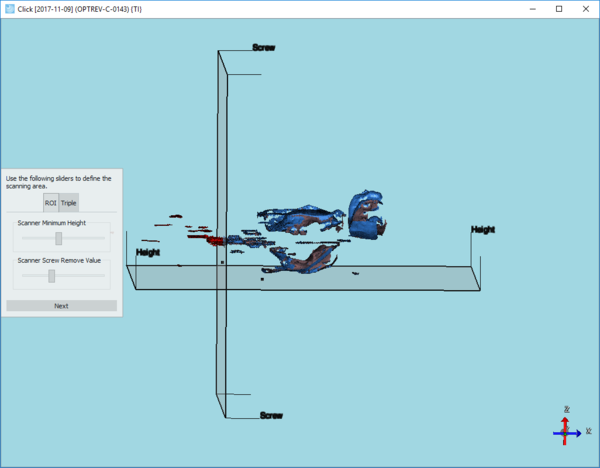
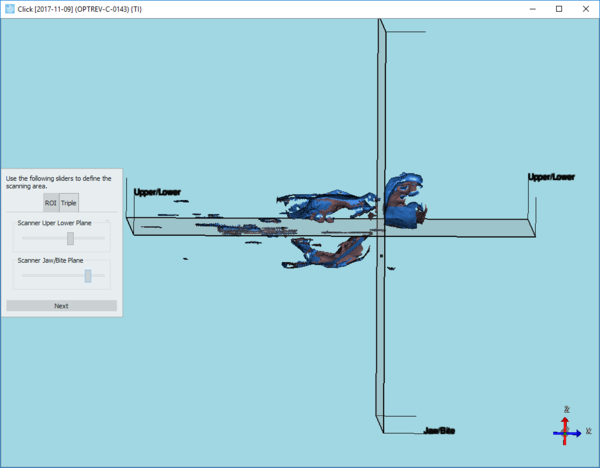
Then, if the Triple Impression Module is enabled in your license, click on the second tab Triple and move the sliders to establish the cut planes to separate the elements (upper from lower and individual from bite)
ダイアログのNextをクリックして、最初の構成プロセスを終了します。
Access Calibration after first Configuration
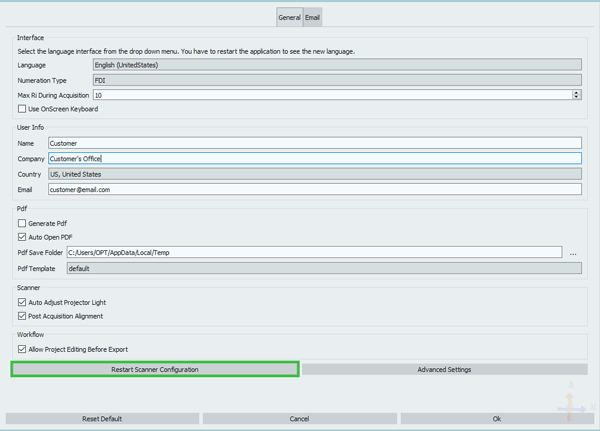
Should it be needed, it is possible to repeat the calibration even after the first configuration of the system simply by accessing the options in the welcome page using the Option Button .
In the first Option Page, General, simply click Restart Scanner Configuration to restart the calibration procedure.
