Difference between revisions of "Wizard"
| (2 intermediate revisions by 2 users not shown) | |||
| Line 1: | Line 1: | ||
| − | {{DISPLAYTITLE:Wizard}} | + | {{DISPLAYTITLE:Wizard|NOERROR}} |
<translate> | <translate> | ||
| − | ==Interface== | + | ==Interface== <!--T:1--> |
| + | <!--T:2--> | ||
After project definition the scanning wizard starts. | After project definition the scanning wizard starts. | ||
| − | [[File: | + | <!--T:3--> |
| + | [[File:Wizard.PNG]] | ||
| + | <!--T:4--> | ||
The main interface is quite simple; on the upper left corner there is the wizard step showing the description of the item that needs to be scanned together with an explainatory picture.<br/> The wizard builds up depending on the workflow that has been chosen during project definition. | The main interface is quite simple; on the upper left corner there is the wizard step showing the description of the item that needs to be scanned together with an explainatory picture.<br/> The wizard builds up depending on the workflow that has been chosen during project definition. | ||
| + | <!--T:5--> | ||
[[File:StepDescription.PNG]] | [[File:StepDescription.PNG]] | ||
| + | <!--T:6--> | ||
On the upper right corner there is the live view of the cameras that serves to correct the light intensity for the object that needs to be scanned. In the image below is an example of the initial light intensity, the parts in red are the parts of the impression that will be difficult to be scanned with the shown light intensity. | On the upper right corner there is the live view of the cameras that serves to correct the light intensity for the object that needs to be scanned. In the image below is an example of the initial light intensity, the parts in red are the parts of the impression that will be difficult to be scanned with the shown light intensity. | ||
| + | <!--T:7--> | ||
[[File:Light.PNG]] | [[File:Light.PNG]] | ||
| + | <!--T:8--> | ||
In order to correct the light intensity click on the '''Auto Adjust''' Button under the live view. <br/>It is also possible to manually adjust the light with the side cursor. | In order to correct the light intensity click on the '''Auto Adjust''' Button under the live view. <br/>It is also possible to manually adjust the light with the side cursor. | ||
| + | <!--T:9--> | ||
[[File:CorrectLight.PNG]] | [[File:CorrectLight.PNG]] | ||
| + | <!--T:10--> | ||
Finally, on the bottom part of the interface there is the ation bar from which the user can decide which action to take during the wizard.<br/> Here is the bar as shown at the beginning of the wizard. | Finally, on the bottom part of the interface there is the ation bar from which the user can decide which action to take during the wizard.<br/> Here is the bar as shown at the beginning of the wizard. | ||
| + | <!--T:11--> | ||
[[File:Barra.PNG]] | [[File:Barra.PNG]] | ||
| + | <!--T:12--> | ||
At the beginning of the wizard the only two actions available are the scanning icon {{Inline button|Scan.PNG}} and the Exit button {Inline button|Quit.PNG}}. | At the beginning of the wizard the only two actions available are the scanning icon {{Inline button|Scan.PNG}} and the Exit button {Inline button|Quit.PNG}}. | ||
| − | ==Scan Project== | + | ==Scan Project== <!--T:13--> |
| + | <!--T:14--> | ||
To start the scan project click on the {{Inline button|Scan.PNG}} icon; three icons green, yellow and red will show, each one represents a scanning strategy | To start the scan project click on the {{Inline button|Scan.PNG}} icon; three icons green, yellow and red will show, each one represents a scanning strategy | ||
| + | <!--T:15--> | ||
[[File:Strategies.PNG]] | [[File:Strategies.PNG]] | ||
| + | <!--T:16--> | ||
;{{Inline button|Green.PNG}} '''Easy''': Few scans and low scan strength. The scan is faster but holds less details of the impression; | ;{{Inline button|Green.PNG}} '''Easy''': Few scans and low scan strength. The scan is faster but holds less details of the impression; | ||
;{{Inline button|Yellow.PNG}} '''Medium''': Medium number of scans and medium scan strenght. The scan is slower than the easy strategy but the image is more detailed. | ;{{Inline button|Yellow.PNG}} '''Medium''': Medium number of scans and medium scan strenght. The scan is slower than the easy strategy but the image is more detailed. | ||
;{{Inline button|Red.PNG}} '''Hard''': High number of scans and hard scan strength. The scan is as detailed as it can be but it will be slower. | ;{{Inline button|Red.PNG}} '''Hard''': High number of scans and hard scan strength. The scan is as detailed as it can be but it will be slower. | ||
| + | <!--T:17--> | ||
Choose one of the three strategies to start scanning. | Choose one of the three strategies to start scanning. | ||
| + | <!--T:18--> | ||
As soon as the scan procedure is over other two icons of the action bar will become available.<br/> If the project is an individual impression the available icon will be the '''End''' icon. | As soon as the scan procedure is over other two icons of the action bar will become available.<br/> If the project is an individual impression the available icon will be the '''End''' icon. | ||
| + | <!--T:19--> | ||
[[File:Actions.PNG]] | [[File:Actions.PNG]] | ||
| + | <!--T:20--> | ||
Alternatively, if in the project need to be scanned two or more impression, the next available icon will be the '''Add Image''' Icon. | Alternatively, if in the project need to be scanned two or more impression, the next available icon will be the '''Add Image''' Icon. | ||
| + | <!--T:21--> | ||
[[File:Actions1.PNG]] | [[File:Actions1.PNG]] | ||
| + | <!--T:22--> | ||
To add images to the acquired impression, turn the scan untill the spot that needs to be filled is completely visible and click on the '''Add Image''' button {{Inline button|AddImage.PNG}}. Repeat the operation until satisfied with the result. | To add images to the acquired impression, turn the scan untill the spot that needs to be filled is completely visible and click on the '''Add Image''' button {{Inline button|AddImage.PNG}}. Repeat the operation until satisfied with the result. | ||
| + | <!--T:23--> | ||
Then, if there are other impression to be scanned click the '''Next''' button {{Inline button|Next.PNG}}. | Then, if there are other impression to be scanned click the '''Next''' button {{Inline button|Next.PNG}}. | ||
<br/>Repeat the scan process seen before for all the impressions that need to be scanned. | <br/>Repeat the scan process seen before for all the impressions that need to be scanned. | ||
| + | <!--T:24--> | ||
When all impression have been scanned the '''End''' button {{Inline button|End.PNG}} will become available. This button closes the scanning procedure and starts the '''Export and Upload Procedure''' | When all impression have been scanned the '''End''' button {{Inline button|End.PNG}} will become available. This button closes the scanning procedure and starts the '''Export and Upload Procedure''' | ||
</translate> | </translate> | ||
{{Navigation|Proj_Def|Upload}} | {{Navigation|Proj_Def|Upload}} | ||
Latest revision as of 08:41, 21 July 2017
Interface
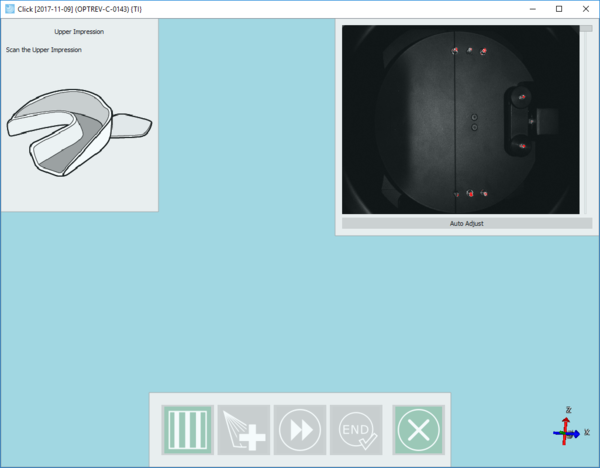
After project definition the scanning wizard starts.
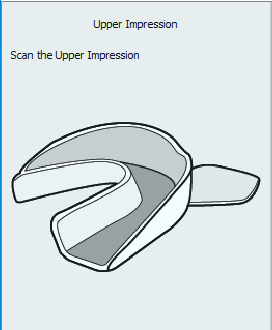
The main interface is quite simple; on the upper left corner there is the wizard step showing the description of the item that needs to be scanned together with an explainatory picture.
The wizard builds up depending on the workflow that has been chosen during project definition.
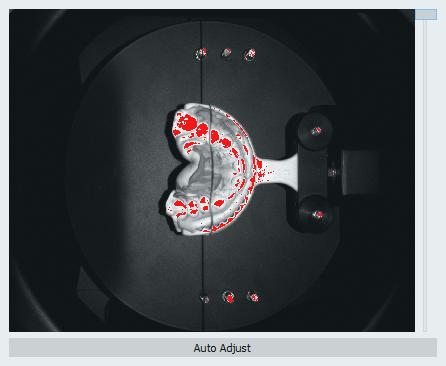
On the upper right corner there is the live view of the cameras that serves to correct the light intensity for the object that needs to be scanned. In the image below is an example of the initial light intensity, the parts in red are the parts of the impression that will be difficult to be scanned with the shown light intensity.
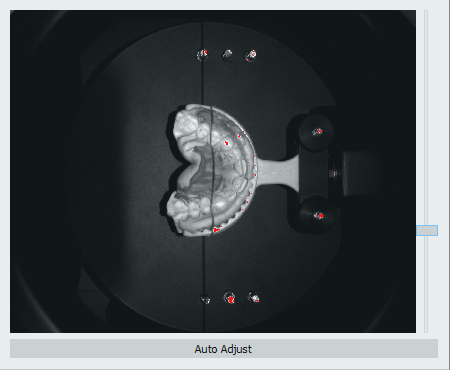
In order to correct the light intensity click on the Auto Adjust Button under the live view.
It is also possible to manually adjust the light with the side cursor.
Finally, on the bottom part of the interface there is the ation bar from which the user can decide which action to take during the wizard.
Here is the bar as shown at the beginning of the wizard.
At the beginning of the wizard the only two actions available are the scanning icon and the Exit button {Inline button|Quit.PNG}}.
Scan Project
To start the scan project click on the icon; three icons green, yellow and red will show, each one represents a scanning strategy
Easy
- Few scans and low scan strength. The scan is faster but holds less details of the impression;
Medium
- Medium number of scans and medium scan strenght. The scan is slower than the easy strategy but the image is more detailed.
Hard
- High number of scans and hard scan strength. The scan is as detailed as it can be but it will be slower.
Choose one of the three strategies to start scanning.
As soon as the scan procedure is over other two icons of the action bar will become available.
If the project is an individual impression the available icon will be the End icon.
Alternatively, if in the project need to be scanned two or more impression, the next available icon will be the Add Image Icon.
To add images to the acquired impression, turn the scan untill the spot that needs to be filled is completely visible and click on the Add Image button . Repeat the operation until satisfied with the result.
Then, if there are other impression to be scanned click the Next button .
Repeat the scan process seen before for all the impressions that need to be scanned.
When all impression have been scanned the End button will become available. This button closes the scanning procedure and starts the Export and Upload Procedure


