Difference between revisions of "Proj Def"
| (3 intermediate revisions by 2 users not shown) | |||
| Line 1: | Line 1: | ||
| − | {{DISPLAYTITLE:Project Definition}} | + | {{DISPLAYTITLE:Project Definition|NOERROR}} |
<translate> | <translate> | ||
| + | <!--T:1--> | ||
Once all configuration are ready and accepted the software goes back to the start splash screen. To start scanning click the '''Play''' icon. | Once all configuration are ready and accepted the software goes back to the start splash screen. To start scanning click the '''Play''' icon. | ||
| + | <!--T:2--> | ||
[[File:Start.PNG]] | [[File:Start.PNG]] | ||
| + | <!--T:3--> | ||
The '''Project Definition''' dialog will immediately show. | The '''Project Definition''' dialog will immediately show. | ||
| + | <!--T:4--> | ||
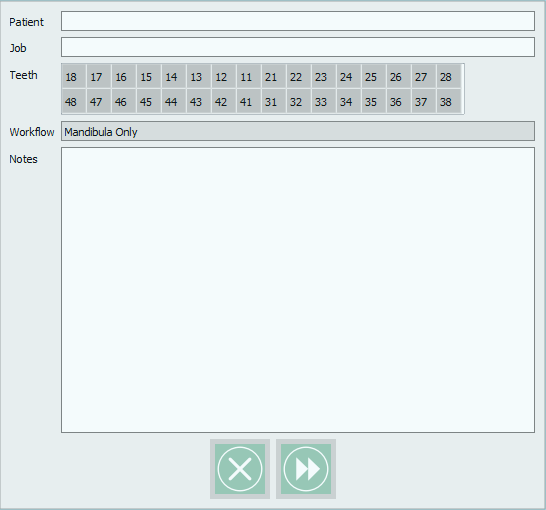
The first part of the Project definition will require the user to set a Patient name and a Job Description. | The first part of the Project definition will require the user to set a Patient name and a Job Description. | ||
| + | <!--T:5--> | ||
[[File:Definition.PNG]] | [[File:Definition.PNG]] | ||
| + | <!--T:6--> | ||
After which the '''Teeth''' focus of the project need to be selected as reference for the partner that will design on the scans. <br\> Note that the teeth definition has no influence on the scanned data. | After which the '''Teeth''' focus of the project need to be selected as reference for the partner that will design on the scans. <br\> Note that the teeth definition has no influence on the scanned data. | ||
<br\> To select the teeth double click on their number. | <br\> To select the teeth double click on their number. | ||
| + | <!--T:7--> | ||
Follows the Workflow definition, in which the user needs to decide which one of the work procedure established in the [[Options_Workflows|Workflows]] Option Panel. | Follows the Workflow definition, in which the user needs to decide which one of the work procedure established in the [[Options_Workflows|Workflows]] Option Panel. | ||
| + | <!--T:8--> | ||
The last space allows the user to insert some notes to furtherly aid the partner that will design on the scans. | The last space allows the user to insert some notes to furtherly aid the partner that will design on the scans. | ||
| + | <!--T:9--> | ||
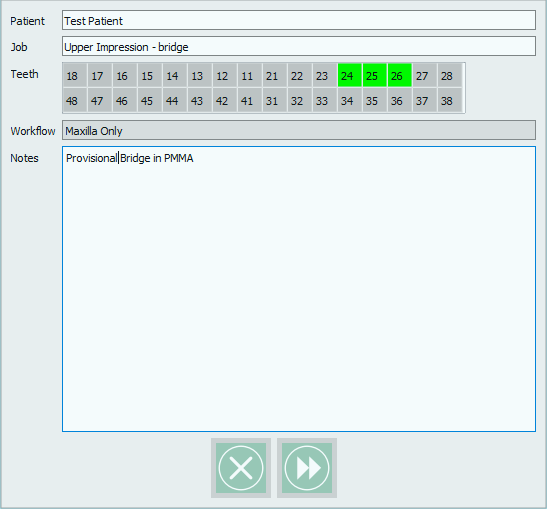
Here is an example of a filled in project definition form | Here is an example of a filled in project definition form | ||
| + | <!--T:10--> | ||
[[File:CompleteDefinition.PNG]] | [[File:CompleteDefinition.PNG]] | ||
| + | <!--T:11--> | ||
Accept your project with {{Inline button|Next.PNG}} to start scanning or cancel with {{Inline button|Cancel.PNG}}. | Accept your project with {{Inline button|Next.PNG}} to start scanning or cancel with {{Inline button|Cancel.PNG}}. | ||
</translate> | </translate> | ||
| − | {{Navigation| | + | {{Navigation|Options_Email|Wizard}} |
Latest revision as of 08:40, 21 July 2017
Once all configuration are ready and accepted the software goes back to the start splash screen. To start scanning click the Play icon.
The Project Definition dialog will immediately show.
The first part of the Project definition will require the user to set a Patient name and a Job Description.
After which the Teeth focus of the project need to be selected as reference for the partner that will design on the scans. <br\> Note that the teeth definition has no influence on the scanned data. <br\> To select the teeth double click on their number.
Follows the Workflow definition, in which the user needs to decide which one of the work procedure established in the Workflows Option Panel.
The last space allows the user to insert some notes to furtherly aid the partner that will design on the scans.
Here is an example of a filled in project definition form


