Difference between revisions of "Options Email/ja"
(Created page with "メールオプション") |
|||
| (16 intermediate revisions by the same user not shown) | |||
| Line 1: | Line 1: | ||
{{DISPLAYTITLE:Email|NOERROR}} | {{DISPLAYTITLE:Email|NOERROR}} | ||
| − | + | メールオプションパネルでは、ユーザーがファイルのアップロード通知の送信に使用するメールアカウントの設定や、自動メールのフォーマット設定を行うことができます。 | |
[[File:Email.PNG]] | [[File:Email.PNG]] | ||
| − | == | + | ==Email(メール)== |
| − | + | 最初のセクションでは、ファイルをメール送信する時に使うメールアドレスを設定することができます。 | |
[[File:SettingsEmpty.PNG]] | [[File:SettingsEmpty.PNG]] | ||
| − | + | 使用するメールアドレスによって、この情報は異なります。以下はGmailアカウント設定時の例です。 | |
[[File:SettingsFull.PNG]] | [[File:SettingsFull.PNG]] | ||
| − | + | ユーザー名およびパスワードには、使用するメールのユーザー名とパスワードを入力します。メールが動作するかテストする場合は、'''Test Email'''(メールのテスト)ボタンをクリックします。 | |
| − | ==Email | + | ==Email Format(メールのフォーマット)== |
| − | + | 2つ目のセクションでは、メール送信時のデフォルトメッセージを設定できます。 | |
| − | + | '''{}'''で囲まれた部分はタグと呼ばれ、この部分はプロジェクト定義で設定された内容で置換されます。 | |
| − | * | + | *デフォルトのテキストフォーマットは以下の通りです。 |
Dear {LabName} | Dear {LabName} | ||
| Line 40: | Line 40: | ||
{Name} {Company} | {Name} {Company} | ||
| − | * | + | *タグの説明については、以下を参照して下さい。 |
| − | ;{Name}: | + | ;{Name}: [[Options_General|一般オプション]]のUser Info(ユーザー情報)で設定した名前 |
| − | ;{Company}: | + | ;{Company}: [[Options_General|一般オプション]]のUser Info(ユーザー情報)で設定した社名 |
| − | ;{PatName}: | + | ;{PatName}: [[Proj_Def|プロジェクト定義]]で設定した患者名 |
| − | ;{Description}: | + | ;{Description}: [[Proj_Def|プロジェクト定義]]で設定したジョブ説明 |
| − | ;{Teeth}: | + | ;{Teeth}: [[Proj_Def|プロジェクト定義]]で設定した歯 |
| − | ;{Notes}: | + | ;{Notes}: [[Proj_Def|プロジェクト定義]]で設定したメモ |
| − | ;{LabName}: | + | ;{LabName}: データを受信する技工所 |
| − | ;{Files}: | + | ;{Files}: アップロードされたファイル(各行に1ファイル) |
| − | + | このメッセージでは、タグを移動したり、残りのテキストを入力したりして、自由に編集することができます。 | |
| − | + | すべての編集が完了したら、以下の操作を行うことができます。 | |
| − | *'''Reset to Default''' | + | *'''Reset to Default'''(デフォルトへリセット)をクリックすると、設定がデフォルトモードに復元されます |
| − | *'''Cancel''' | + | *'''Cancel'''をクリックすると、すべての変更内容が破棄されます |
| − | *'''Ok''' | + | *'''Ok'''をクリックすると、変更内容が確定され、閉じます |
{{Navigation|Options_General|Proj_Def}} | {{Navigation|Options_General|Proj_Def}} | ||
Latest revision as of 05:06, 14 October 2017
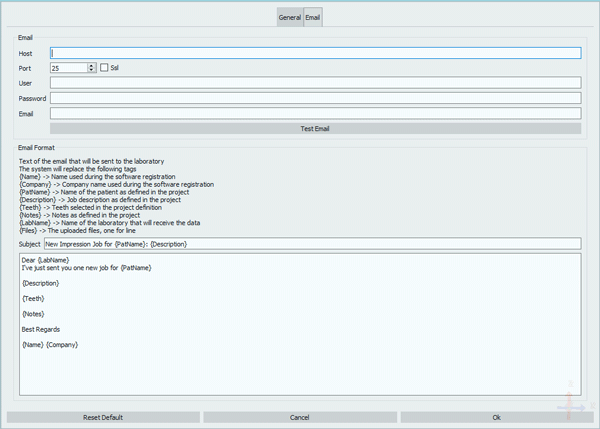
メールオプションパネルでは、ユーザーがファイルのアップロード通知の送信に使用するメールアカウントの設定や、自動メールのフォーマット設定を行うことができます。
Email(メール)
最初のセクションでは、ファイルをメール送信する時に使うメールアドレスを設定することができます。
使用するメールアドレスによって、この情報は異なります。以下はGmailアカウント設定時の例です。
ユーザー名およびパスワードには、使用するメールのユーザー名とパスワードを入力します。メールが動作するかテストする場合は、Test Email(メールのテスト)ボタンをクリックします。
Email Format(メールのフォーマット)
2つ目のセクションでは、メール送信時のデフォルトメッセージを設定できます。
{}で囲まれた部分はタグと呼ばれ、この部分はプロジェクト定義で設定された内容で置換されます。
- デフォルトのテキストフォーマットは以下の通りです。
Dear {LabName}
I've just sent you one new job for {PatName}
{Description}
{Teeth}
{Notes}
Best Regards
{Name} {Company}
- タグの説明については、以下を参照して下さい。
- {Name}
- 一般オプションのUser Info(ユーザー情報)で設定した名前
- {Company}
- 一般オプションのUser Info(ユーザー情報)で設定した社名
- {PatName}
- プロジェクト定義で設定した患者名
- {Description}
- プロジェクト定義で設定したジョブ説明
- {Teeth}
- プロジェクト定義で設定した歯
- {Notes}
- プロジェクト定義で設定したメモ
- {LabName}
- データを受信する技工所
- {Files}
- アップロードされたファイル(各行に1ファイル)
このメッセージでは、タグを移動したり、残りのテキストを入力したりして、自由に編集することができます。
すべての編集が完了したら、以下の操作を行うことができます。
- Reset to Default(デフォルトへリセット)をクリックすると、設定がデフォルトモードに復元されます
- Cancelをクリックすると、すべての変更内容が破棄されます
- Okをクリックすると、変更内容が確定され、閉じます


