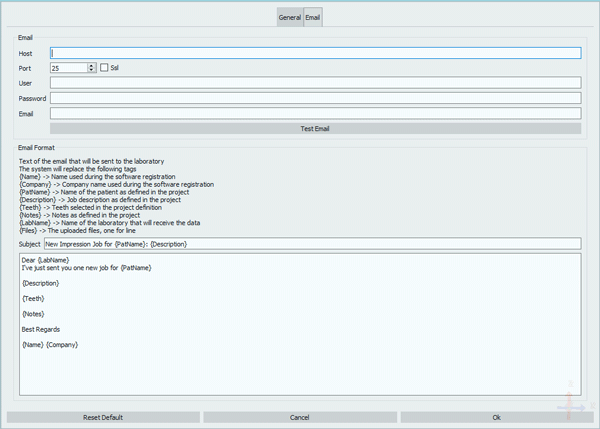
メールオプションパネルでは、ユーザーがファイルのアップロード通知の送信に使用するメールアカウントの設定や、自動メールのフォーマット設定を行うことができます。
Email(メール)
最初のセクションでは、送信するファイルをメール送信する時のメールアドレスを設定することができます。
使用するメールアドレスによって、この情報は異なります。以下はGmailアカウント設定時の例です。
ユーザー名およびパスワードには、使用するメールのユーザー名とパスワードを入力します。メールが動作するかテストする場合は、Test Email(メールのテスト)ボタンをクリックします。
Email Format
This second section allows to set the default message that will be written in the email.
The parts between the parentheses {}, called tags, will be replaced with the details set during project definition.
- The default text format is:
Dear {LabName}
I've just sent you one new job for {PatName}
{Description}
{Teeth}
{Notes}
Best Regards
{Name} {Company}
- The legenda for the tags is:
- {Name}
- corresponds with the name set in the User Info of the General Options;
- {Company}
- corresponds with the Company name set in the User Info of the General Options;
- {PatName}
- corresponds with the name of the patient as set in the Project Definition;
- {Description}
- corresponds with the job description as set in the Project Definition;
- {Teeth}
- corresponds with the teeth set in the Project Definition;
- {Notes}
- corresponds with the notes set in the Project Definition;
- {LabName}
- corresponds with the laboratory that will receive the data;
- {Files}
- corresponds with the uploaded files, one for line;
This message can be edited as wishes by moving the tags and typing in the rest of the text.
Once all modifications are performed it is possible to click
- Reset to Default, if the user wants to restore the settings to default mode;
- Cancel, to discard all changes;
- Ok, to accept the changes and close.


