Warning: Display title "Email" overrides earlier display title "Opzioni: Email".
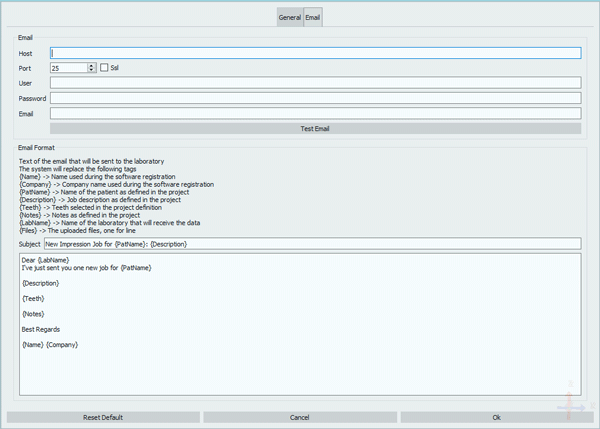
Il pannello Opzioni Email permette di definire l'account di posta dal quale l'utente invierà le notifiche di caricamento dei file e il template dell'email automatica.
In questa prima sezione è possibile definire l'indirizzo email dal quale i messaggi contenenti i file saranno inviati.
A seconda dell'indirizzo email che l'utente desidera impostare, le informazioni potrebbero variare. Di seguito un esempio delle impostazioni utilizzando un account Gmail.
I dati "Username" e "Password" saranno tali allo username e password dell'email scelta. Per testare se l'email funziona, cliccare sul bottone Test Email.
Formato Email
Questa seconda sezione permette di impostare il messaggio automatico dell'email.
Le sezioni tra parentesi {}, definite tag, verranno rimpiazzate con le informazioni inserite durante la definizione del progetto.
- Il messaggio automatico è il seguente:
Gentile {NomeLaboratorio}
I've just sent you one new job for {PatName}
{Description}
{Teeth}
{Notes}
Best Regards
{Name} {Company}
- The legenda for the tags is:
- {Name}
- corresponds with the name set in the User Info of the General Options;
- {Company}
- corresponds with the Company name set in the User Info of the General Options;
- {PatName}
- corresponds with the name of the patient as set in the Project Definition;
- {Description}
- corresponds with the job description as set in the Project Definition;
- {Teeth}
- corresponds with the teeth set in the Project Definition;
- {Notes}
- corresponds with the notes set in the Project Definition;
- {LabName}
- corresponds with the laboratory that will receive the data;
- {Files}
- corresponds with the uploaded files, one for line;
This message can be edited as wishes by moving the tags and typing in the rest of the text.
Once all modifications are performed it is possible to click
- Reset to Default, if the user wants to restore the settings to default mode;
- Cancel, to discard all changes;
- Ok, to accept the changes and close.


