Difference between revisions of "Options General/ja"
(Created page with "このセクションでは、ファイルを保存するフォルダを選択できます。<br/> 表示されるメニューから、出力ファイルのフォーマット...") |
(Created page with "==ユーザー情報==") |
||
| Line 14: | Line 14: | ||
表示されるメニューから、出力ファイルのフォーマットも選択できます。デフォルトでは、ファイルは.STLでエクスポートされますが、別のフォーマットを選択することもできます。例えば、スキャンの色情報を保持する必要がなければ、.OBJでエクスポートすることができます。 | 表示されるメニューから、出力ファイルのフォーマットも選択できます。デフォルトでは、ファイルは.STLでエクスポートされますが、別のフォーマットを選択することもできます。例えば、スキャンの色情報を保持する必要がなければ、.OBJでエクスポートすることができます。 | ||
| − | == | + | ==ユーザー情報== |
In this section the user can provide some general and contact information that we strongly suggest to provide because in case of software error an automated error report will be sent to our support department, and will allow us to contact the user as soon and effectively as possible. | In this section the user can provide some general and contact information that we strongly suggest to provide because in case of software error an automated error report will be sent to our support department, and will allow us to contact the user as soon and effectively as possible. | ||
Revision as of 06:56, 4 October 2017
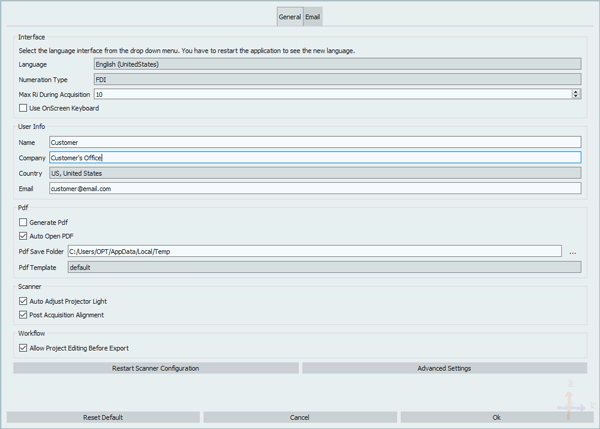
一般オプションでは、スキャンソフトウェアの基本的な設定を変更できます。
Contents
インターフェース
このセクションでは、ソフトウェアの言語を変更できます。ソフトウェアの言語は、コンピュータのシステム言語に従って自動で設定されるので、希なケースを除き、この設定を変更する必要はありません。
エクスポート
このセクションでは、ファイルを保存するフォルダを選択できます。
表示されるメニューから、出力ファイルのフォーマットも選択できます。デフォルトでは、ファイルは.STLでエクスポートされますが、別のフォーマットを選択することもできます。例えば、スキャンの色情報を保持する必要がなければ、.OBJでエクスポートすることができます。
ユーザー情報
In this section the user can provide some general and contact information that we strongly suggest to provide because in case of software error an automated error report will be sent to our support department, and will allow us to contact the user as soon and effectively as possible.
Scanner
This section regulates the scanner hardware settings
Auto Adjust Projector Light
If active, this options allows the software to automatically adjust the light intensity of the projector based on the texture of the inserted impression. It is advised to check this option to guarantee the best possible scanning performances.
Post Acquisition Alignment
This option performs all alignemts on the image after the scanning process is finished; it can be considered as a safety check for possible wrong superpositions of the views of the impression.
Restart Scanner Configuration
This button allows to start over with the First Software Configuration as seen in the previous pages.
This procedure can be run if the customer wants to recalibrate, set another scanner on the same computer or change the scanning hight.
Advanced Settings
Allows the access to advanced settings
Once all modifications are performed it is possible to click
- Reset to Default, if the user wants to restore the settings to default mode;
- Cancel, to discard all changes;
- Ok, to accept the changes and close.


