Difference between revisions of "Wizard/ja"
(Created page with "メインのインターフェースは非常にシンプルです。左上にはウィザードステップがあり、スキャンする必要のあるアイテムの説明...") |
|||
| (19 intermediate revisions by the same user not shown) | |||
| Line 7: | Line 7: | ||
[[File:Wizard.PNG]] | [[File:Wizard.PNG]] | ||
| − | + | メインのインターフェースは非常にシンプルです。左上にはウィザードステップがあり、一緒にスキャンする必要のあるアイテムの説明と図が表示されます。<br/> このウィザードは、プロジェクト定義で選択されたワークフローに基づいて進められます。 | |
[[File:StepDescription.PNG]] | [[File:StepDescription.PNG]] | ||
| − | + | 右上にはカメラのライブビューがあり、スキャンするオブジェクトの光量調整に利用します。以下は初期状態の光量を示した例です。赤く表示されている部分では、スキャンが困難になります。 | |
[[File:Light.PNG]] | [[File:Light.PNG]] | ||
| − | + | 光量を調整するには、ライブビューの下にある'''Auto Adjust'''(自動調整)ボタンをクリックします。 <br/>横のスライダで光量を手動調整することもできます。 | |
[[File:CorrectLight.PNG]] | [[File:CorrectLight.PNG]] | ||
| − | + | インターフェースの下部には、アクションバーがあります。ここでは、ウィザード中に実行するアクションを決定できます。<br/>ウィザード開始時点では、以下のバーが表示されています。 | |
[[File:Barra.PNG]] | [[File:Barra.PNG]] | ||
| − | + | ウィザードの開始時点で利用できるアクションは、スキャンアイコン {{Inline button|Scan.PNG}} と終了ボタン {Inline button|Quit.PNG}} の2つのみです。 | |
| − | == | + | ==スキャンプロジェクト== |
| − | + | スキャンプロジェクトを開始するには、{{Inline button|Scan.PNG}} アイコンをクリックします。緑色、黄色、赤色の3つのアイコンが表示されます。これらはスキャン計画を表しています。 | |
[[File:Strategies.PNG]] | [[File:Strategies.PNG]] | ||
| − | ;{{Inline button|Green.PNG}} ''' | + | ;{{Inline button|Green.PNG}} '''イージー''': スキャン回数が少なく、スキャン強度も低くなります。高速でスキャンできますが、印象から取得される情報の詳細レベルは低下します。 |
| − | ;{{Inline button|Yellow.PNG}} ''' | + | ;{{Inline button|Yellow.PNG}} '''ミディアム''': スキャン回数は中程度で、スキャンの強度も中程度になります。「イージー」よりもスキャンスピードは遅くなりますが、画像はより詳細なものになります。 |
| − | ;{{Inline button|Red.PNG}} ''' | + | ;{{Inline button|Red.PNG}} '''ハード''': スキャン回数が多く、スキャンの強度も高くなります。スキャンの詳細レベルは最高になりますが、スピードはさらに低下します。 |
| − | + | いずれかを選択して、スキャンを開始します。 | |
| − | + | スキャン処理が完了すると、アクションバーで残りの2つのアイコンがクリックできるようになります。<br/> 単一の印象のプロジェクトでは、'''End'''アイコンがクリックできるようになります。 | |
[[File:Actions.PNG]] | [[File:Actions.PNG]] | ||
| − | + | プロジェクトで2つ以上の印象をスキャンする必要がある場合は、'''画像の追加''' アイコンがクリックできるようになります。 | |
[[File:Actions1.PNG]] | [[File:Actions1.PNG]] | ||
| − | + | 取得した印象に画像を追加するには、スキャンを動かして、埋める必要のある部分が完全に見えるようにし、'''画像の追加'''ボタン {{Inline button|AddImage.PNG}} をクリックします。適切な結果が得られるまで、この手順を繰り返して下さい。 | |
| − | + | 次に、ほかにスキャンする印象がある場合は、'''次に'''ボタン {{Inline button|Next.PNG}} をクリックします。 | |
| − | <br/> | + | <br/>前述のスキャン手順に従って、すべての印象のスキャンを実行します。 |
| − | + | すべての印象のスキャンが完了したら、'''End'''ボタン {{Inline button|End.PNG}} がクリックできるようになります。このボタンはスキャン処理を終了し、'''エクスポートおよびアップロード処理'''を開始します。 | |
{{Navigation|Proj_Def|Upload}} | {{Navigation|Proj_Def|Upload}} | ||
Latest revision as of 05:49, 14 October 2017
インターフェース
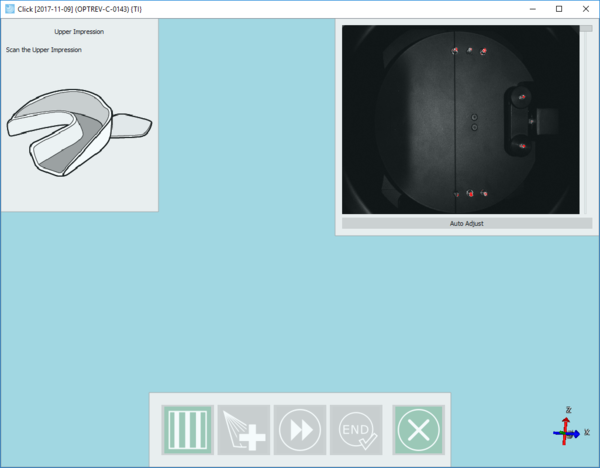
プロジェクト定義を完了すると、スキャンウィザードが開始します。
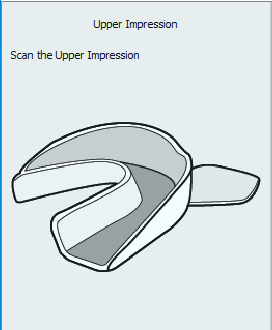
メインのインターフェースは非常にシンプルです。左上にはウィザードステップがあり、一緒にスキャンする必要のあるアイテムの説明と図が表示されます。
このウィザードは、プロジェクト定義で選択されたワークフローに基づいて進められます。
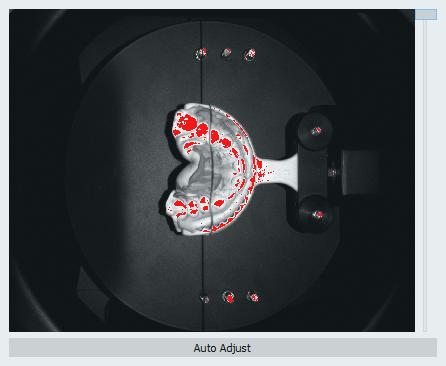
右上にはカメラのライブビューがあり、スキャンするオブジェクトの光量調整に利用します。以下は初期状態の光量を示した例です。赤く表示されている部分では、スキャンが困難になります。
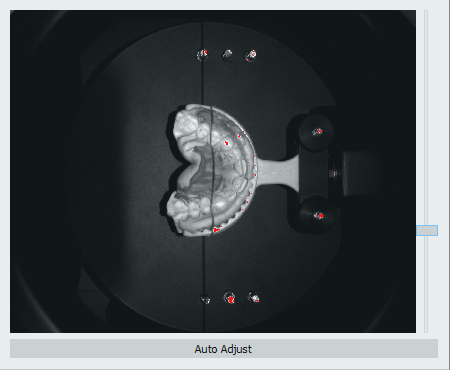
光量を調整するには、ライブビューの下にあるAuto Adjust(自動調整)ボタンをクリックします。
横のスライダで光量を手動調整することもできます。
インターフェースの下部には、アクションバーがあります。ここでは、ウィザード中に実行するアクションを決定できます。
ウィザード開始時点では、以下のバーが表示されています。
ウィザードの開始時点で利用できるアクションは、スキャンアイコン と終了ボタン {Inline button|Quit.PNG}} の2つのみです。
スキャンプロジェクト
スキャンプロジェクトを開始するには、 アイコンをクリックします。緑色、黄色、赤色の3つのアイコンが表示されます。これらはスキャン計画を表しています。
イージー
- スキャン回数が少なく、スキャン強度も低くなります。高速でスキャンできますが、印象から取得される情報の詳細レベルは低下します。
ミディアム
- スキャン回数は中程度で、スキャンの強度も中程度になります。「イージー」よりもスキャンスピードは遅くなりますが、画像はより詳細なものになります。
ハード
- スキャン回数が多く、スキャンの強度も高くなります。スキャンの詳細レベルは最高になりますが、スピードはさらに低下します。
いずれかを選択して、スキャンを開始します。
スキャン処理が完了すると、アクションバーで残りの2つのアイコンがクリックできるようになります。
単一の印象のプロジェクトでは、Endアイコンがクリックできるようになります。
プロジェクトで2つ以上の印象をスキャンする必要がある場合は、画像の追加 アイコンがクリックできるようになります。
取得した印象に画像を追加するには、スキャンを動かして、埋める必要のある部分が完全に見えるようにし、画像の追加ボタン をクリックします。適切な結果が得られるまで、この手順を繰り返して下さい。
次に、ほかにスキャンする印象がある場合は、次にボタン をクリックします。
前述のスキャン手順に従って、すべての印象のスキャンを実行します。
すべての印象のスキャンが完了したら、Endボタン がクリックできるようになります。このボタンはスキャン処理を終了し、エクスポートおよびアップロード処理を開始します。


