Difference between revisions of "Proj Def/ja"
(Created page with "'''プロジェクト定義'''ダイアログが表示されます。") |
|||
| (8 intermediate revisions by the same user not shown) | |||
| Line 1: | Line 1: | ||
{{DISPLAYTITLE:Project Definition|NOERROR}} | {{DISPLAYTITLE:Project Definition|NOERROR}} | ||
| − | すべての構成が完了したら、ソフトウェアは最初のスプラッシュ画面に戻ります。スキャンを開始するには、''' | + | すべての構成が完了したら、ソフトウェアは最初のスプラッシュ画面に戻ります。スキャンを開始するには、'''開始'''アイコンをクリックします。 |
[[File:Start.PNG]] | [[File:Start.PNG]] | ||
| Line 7: | Line 7: | ||
'''プロジェクト定義'''ダイアログが表示されます。 | '''プロジェクト定義'''ダイアログが表示されます。 | ||
| − | + | プロジェクト定義では、まず患者名とジョブ説明を入力する必要があります。 | |
[[File:Definition.PNG]] | [[File:Definition.PNG]] | ||
| − | + | 次に、プロジェクトの重要項目である'''Teeth'''(歯)を、スキャン上で設計を行うパートナー向けのリファレンスとして選択する必要があります。<br /> 歯の定義は、スキャンしたデータには影響しないことに注意して下さい。 | |
| − | <br | + | <br /> 歯を選択するには、その番号をダブルクリックします。 |
| − | + | ワークフロー定義に進みます。ここでは、[[Options_Workflows|ワークフロー]]オプションパネルで設定されたワークフローを一つ選択します。 | |
| − | + | 最後の領域では、スキャン上で設計を行うパートナー向けに追加のメモや連絡事項を追加できます。 | |
| − | + | 以下は、入力済みのプロジェクト定義フォームの一例です。 | |
[[File:CompleteDefinition.PNG]] | [[File:CompleteDefinition.PNG]] | ||
| − | + | {{Inline button|Next.PNG}} でプロジェクトを確定してスキャンを開始するか、{{Inline button|Cancel.PNG}} でキャンセルします。 | |
{{Navigation|Options_Email|Wizard}} | {{Navigation|Options_Email|Wizard}} | ||
Latest revision as of 05:40, 14 October 2017
すべての構成が完了したら、ソフトウェアは最初のスプラッシュ画面に戻ります。スキャンを開始するには、開始アイコンをクリックします。
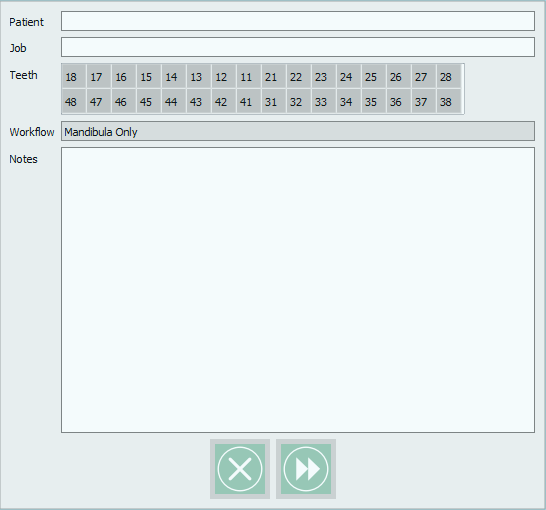
プロジェクト定義ダイアログが表示されます。
プロジェクト定義では、まず患者名とジョブ説明を入力する必要があります。
次に、プロジェクトの重要項目であるTeeth(歯)を、スキャン上で設計を行うパートナー向けのリファレンスとして選択する必要があります。
歯の定義は、スキャンしたデータには影響しないことに注意して下さい。
歯を選択するには、その番号をダブルクリックします。
ワークフロー定義に進みます。ここでは、ワークフローオプションパネルで設定されたワークフローを一つ選択します。
最後の領域では、スキャン上で設計を行うパートナー向けに追加のメモや連絡事項を追加できます。
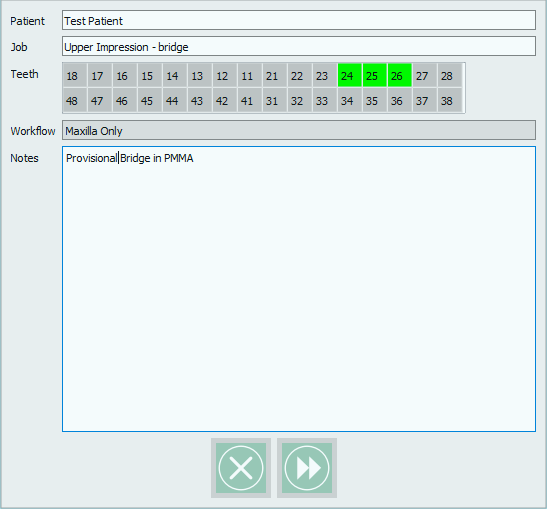
以下は、入力済みのプロジェクト定義フォームの一例です。


