Difference between revisions of "Options General/ja"
(Created page with "一般設定") |
|||
| (28 intermediate revisions by the same user not shown) | |||
| Line 1: | Line 1: | ||
{{DISPLAYTITLE:General Options|NOERROR}} | {{DISPLAYTITLE:General Options|NOERROR}} | ||
| − | + | 一般オプションでは、スキャンソフトウェアの基本的な設定を変更できます。 | |
[[File:General.PNG]] | [[File:General.PNG]] | ||
| − | == | + | ==Interface(インターフェース)== |
| − | + | このセクションでは、ソフトウェアの言語を変更できます。ソフトウェアの言語はコンピュータのシステム言語に従って自動で設定されるので、希なケースを除き、この設定を変更する必要はありません。 | |
| − | == | + | ==Export(エクスポート)== |
| − | + | このセクションでは、ファイルを保存するフォルダを選択できます。<br/> | |
| − | + | 表示されるメニューから、出力ファイルのフォーマットも選択できます。デフォルトでは、ファイルは.STLでエクスポートされますが、別のフォーマットを選択することもできます。例えば、スキャンの色情報を保持する必要がなければ、.OBJでエクスポートすることができます。 | |
| − | ==User | + | ==User Info(ユーザー情報)== |
| − | + | このセクションでは、一般情報および連絡先情報を入力できます。このセクションに情報を入力することで、ソフトウェアエラー発生時にエラーレポートが自動で送信され、こちらのサポートチームが迅速に対応できるようになります。 | |
| − | == | + | ==Scanner(スキャナー)== |
| − | + | このセクションでは、スキャナーのハードウェア設定を制御します。 | |
| − | ===Auto Adjust Projector | + | ===Auto Adjust Projector Light(プロジェクターの自動光量調整)=== |
| − | + | このオプションを有効にすると、設置された印象のテクスチャに合わせてプロジェクターの光の強さが自動的に調整されます。スキャンのパフォーマンスを最適化するため、このオプションを有効にすることをお勧めします。 | |
| − | ===Post Acquisition | + | ===Post Acquisition Alignment(取得後のアライメント)=== |
| − | + | このオプションでは、スキャンプロセス終了後に画像でのすべてのアライメントが実行されます。印象のビューが誤って重なっていないかどうか、念のためのチェックとして利用することができます。 | |
| − | ===Restart Scanner | + | ===Restart Scanner Configuration(スキャナー構成の再起動)=== |
| − | + | このボタンでは、前のページで説明した[[Software_Configuration|ソフトウェアの初期構成]]を再度実行できます。<br/> キャリブレーションしたり、同じコンピュータ上で別のスキャナーを設定したり、スキャンの高さを変更したりしたい場合に実行して下さい。 | |
| − | ===Advanced | + | ===Advanced Settings(アドバンス設定)=== |
| − | + | アドバンス設定にアクセスできます。 | |
| − | + | すべての編集が完了したら、以下の操作を行うことができます。 | |
| − | *'''Reset to Default''' | + | *'''Reset to Default'''(デフォルトへリセット)をクリックすると、設定がデフォルトモードに復元されます |
| − | *'''Cancel''' | + | *'''Cancel'''をクリックすると、すべての変更内容が破棄されます |
| − | *'''Ok''' | + | *'''Ok'''をクリックすると、変更内容が確定され、閉じます |
{{Navigation|Options_Panel|Options_Email}} | {{Navigation|Options_Panel|Options_Email}} | ||
Latest revision as of 05:02, 14 October 2017
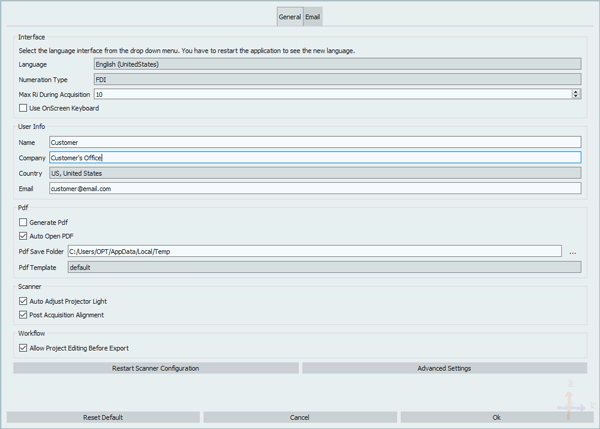
一般オプションでは、スキャンソフトウェアの基本的な設定を変更できます。
Contents
Interface(インターフェース)
このセクションでは、ソフトウェアの言語を変更できます。ソフトウェアの言語はコンピュータのシステム言語に従って自動で設定されるので、希なケースを除き、この設定を変更する必要はありません。
Export(エクスポート)
このセクションでは、ファイルを保存するフォルダを選択できます。
表示されるメニューから、出力ファイルのフォーマットも選択できます。デフォルトでは、ファイルは.STLでエクスポートされますが、別のフォーマットを選択することもできます。例えば、スキャンの色情報を保持する必要がなければ、.OBJでエクスポートすることができます。
User Info(ユーザー情報)
このセクションでは、一般情報および連絡先情報を入力できます。このセクションに情報を入力することで、ソフトウェアエラー発生時にエラーレポートが自動で送信され、こちらのサポートチームが迅速に対応できるようになります。
Scanner(スキャナー)
このセクションでは、スキャナーのハードウェア設定を制御します。
Auto Adjust Projector Light(プロジェクターの自動光量調整)
このオプションを有効にすると、設置された印象のテクスチャに合わせてプロジェクターの光の強さが自動的に調整されます。スキャンのパフォーマンスを最適化するため、このオプションを有効にすることをお勧めします。
Post Acquisition Alignment(取得後のアライメント)
このオプションでは、スキャンプロセス終了後に画像でのすべてのアライメントが実行されます。印象のビューが誤って重なっていないかどうか、念のためのチェックとして利用することができます。
Restart Scanner Configuration(スキャナー構成の再起動)
このボタンでは、前のページで説明したソフトウェアの初期構成を再度実行できます。
キャリブレーションしたり、同じコンピュータ上で別のスキャナーを設定したり、スキャンの高さを変更したりしたい場合に実行して下さい。
Advanced Settings(アドバンス設定)
アドバンス設定にアクセスできます。
すべての編集が完了したら、以下の操作を行うことができます。
- Reset to Default(デフォルトへリセット)をクリックすると、設定がデフォルトモードに復元されます
- Cancelをクリックすると、すべての変更内容が破棄されます
- Okをクリックすると、変更内容が確定され、閉じます


