Difference between revisions of "Options Email/ja"
(Created page with "==Email(メール)==") |
(Created page with "最初のセクションでは、送信するファイルをメール送信する時のメールアドレスを設定することができます。") |
||
| Line 7: | Line 7: | ||
==Email(メール)== | ==Email(メール)== | ||
| − | + | 最初のセクションでは、送信するファイルをメール送信する時のメールアドレスを設定することができます。 | |
[[File:SettingsEmpty.PNG]] | [[File:SettingsEmpty.PNG]] | ||
Revision as of 07:28, 4 October 2017
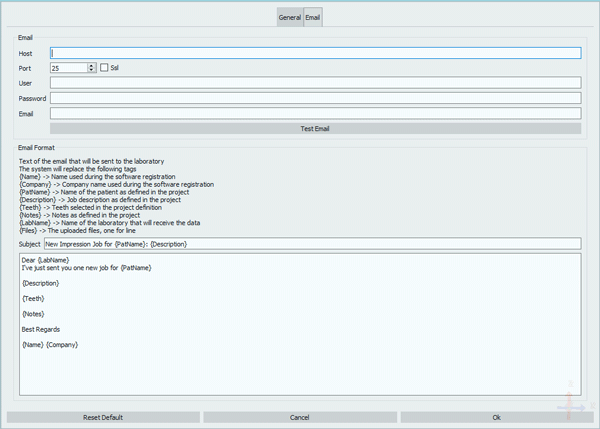
メールオプションパネルでは、ユーザーがファイルのアップロード通知の送信に使用するメールアカウントの設定や、自動メールのフォーマット設定を行うことができます。
Email(メール)
最初のセクションでは、送信するファイルをメール送信する時のメールアドレスを設定することができます。
Depending on the email address the user wishes to use, this information will vary. Here below find and example of the settings valid for a Gmail account.
The Username and the Password will always be the user and password of the chosen email. To test if the email works, click on the Test Email button.
Email Format
This second section allows to set the default message that will be written in the email.
The parts between the parentheses {}, called tags, will be replaced with the details set during project definition.
- The default text format is:
Dear {LabName}
I've just sent you one new job for {PatName}
{Description}
{Teeth}
{Notes}
Best Regards
{Name} {Company}
- The legenda for the tags is:
- {Name}
- corresponds with the name set in the User Info of the General Options;
- {Company}
- corresponds with the Company name set in the User Info of the General Options;
- {PatName}
- corresponds with the name of the patient as set in the Project Definition;
- {Description}
- corresponds with the job description as set in the Project Definition;
- {Teeth}
- corresponds with the teeth set in the Project Definition;
- {Notes}
- corresponds with the notes set in the Project Definition;
- {LabName}
- corresponds with the laboratory that will receive the data;
- {Files}
- corresponds with the uploaded files, one for line;
This message can be edited as wishes by moving the tags and typing in the rest of the text.
Once all modifications are performed it is possible to click
- Reset to Default, if the user wants to restore the settings to default mode;
- Cancel, to discard all changes;
- Ok, to accept the changes and close.


