Difference between revisions of "Options Uploads"
| (One intermediate revision by one other user not shown) | |||
| Line 2: | Line 2: | ||
<translate> | <translate> | ||
| + | <!--T:1--> | ||
In this section it is possbile to create and manage the profiles of the partners to which the files have to be sent. | In this section it is possbile to create and manage the profiles of the partners to which the files have to be sent. | ||
| + | <!--T:2--> | ||
[[File:Uploads.PNG]] | [[File:Uploads.PNG]] | ||
| + | <!--T:3--> | ||
To add a new profile click on the '''New''' button on the bottom left corner of the dialog. | To add a new profile click on the '''New''' button on the bottom left corner of the dialog. | ||
| + | <!--T:4--> | ||
[[File:New.png]] | [[File:New.png]] | ||
| + | <!--T:5--> | ||
Immediately a ''New Profile'' will be created. To change its name and parameters edit the values on the right of the profile list. | Immediately a ''New Profile'' will be created. To change its name and parameters edit the values on the right of the profile list. | ||
| + | <!--T:6--> | ||
The firts two things that can be edited are the name of the profile and the email address of the partner. | The firts two things that can be edited are the name of the profile and the email address of the partner. | ||
| + | <!--T:7--> | ||
Then, for the automatic file sharing to work, it is necessary to insert the information of the receiving FTP space. This information will be provided by the owner of the ftp space itself.<br/> Here is an example of an FPT space provided by Open Technologies, to which the customer can add a password simply by clicking '''Set Password'''. | Then, for the automatic file sharing to work, it is necessary to insert the information of the receiving FTP space. This information will be provided by the owner of the ftp space itself.<br/> Here is an example of an FPT space provided by Open Technologies, to which the customer can add a password simply by clicking '''Set Password'''. | ||
| + | <!--T:8--> | ||
[[File:FTPexample.PNG]] | [[File:FTPexample.PNG]] | ||
| + | <!--T:9--> | ||
To test the functioning of the FTP space, click on the '''Test Login''' button. | To test the functioning of the FTP space, click on the '''Test Login''' button. | ||
| + | <!--T:10--> | ||
Once all the profiles for the partners are saved it is possible to click | Once all the profiles for the partners are saved it is possible to click | ||
| + | <!--T:11--> | ||
*'''Reset to Default''', if the user wants to restore the settings to default mode; | *'''Reset to Default''', if the user wants to restore the settings to default mode; | ||
*'''Cancel''', to discard all changes; | *'''Cancel''', to discard all changes; | ||
| Line 30: | Line 41: | ||
</translate> | </translate> | ||
| − | {{Navigation|Options_Email| | + | {{Navigation|Options_Email|Proj_Def}} |
Latest revision as of 06:33, 5 July 2017
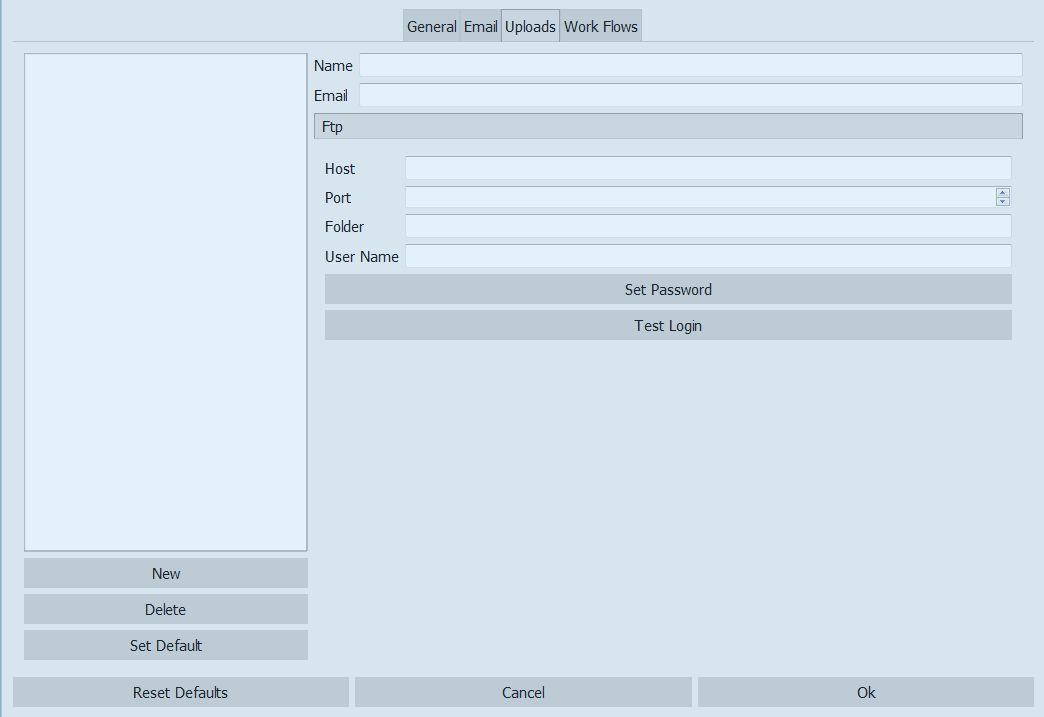
In this section it is possbile to create and manage the profiles of the partners to which the files have to be sent.
To add a new profile click on the New button on the bottom left corner of the dialog.
Immediately a New Profile will be created. To change its name and parameters edit the values on the right of the profile list.
The firts two things that can be edited are the name of the profile and the email address of the partner.
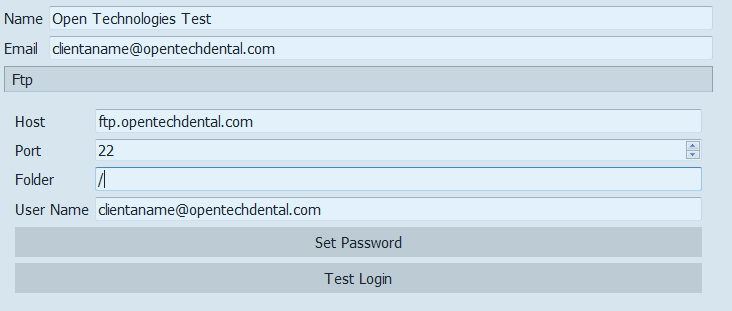
Then, for the automatic file sharing to work, it is necessary to insert the information of the receiving FTP space. This information will be provided by the owner of the ftp space itself.
Here is an example of an FPT space provided by Open Technologies, to which the customer can add a password simply by clicking Set Password.
To test the functioning of the FTP space, click on the Test Login button.
Once all the profiles for the partners are saved it is possible to click
- Reset to Default, if the user wants to restore the settings to default mode;
- Cancel, to discard all changes;
- Ok, to accept the changes and close.


