Difference between revisions of "Options General"
(→Export) |
|||
| Line 25: | Line 25: | ||
===Auto Adjust Projector Light=== | ===Auto Adjust Projector Light=== | ||
| − | ===Post | + | If active, this options allows the software to automatically adjust the light intensity of the projector based on the texture of the inserted impression. It is advised to check this option to guarantee the best possible scanning performances. |
| + | |||
| + | ===Post Acquisition Alignment=== | ||
| + | |||
| + | This option performs all alignemts on the image after the scanning process is finished; it can be considered as a safety check for possible wrong superpositions of the views of the impression. | ||
===Restart Scanner Configuration=== | ===Restart Scanner Configuration=== | ||
| + | |||
| + | This button allows to start over with the [[Software_Configuration|First Software Configuration]] as seen in the previous pages. <br\> This procedure can bu run if the customer wants to recalibrate, set another scanner on the same computer or change the scanning hight. | ||
===Advanced Settings=== | ===Advanced Settings=== | ||
| + | |||
| + | Allows the access to advanced settings | ||
</translate> | </translate> | ||
{{Navigation|Main Page|Options_Email}} | {{Navigation|Main Page|Options_Email}} | ||
Revision as of 09:23, 28 November 2016
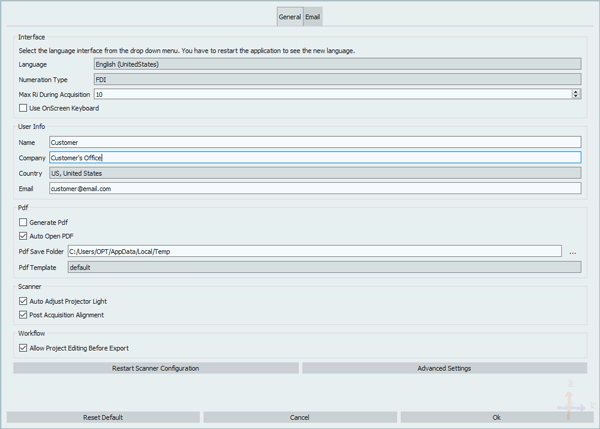
The General Options allow the user to change the basic settings of the scan software.
Contents
Interface
In this section it is possible to change the language of the software. The language is automatically set on the system language of the computer so, with the exceptions of rare cases, it shouldn't be necessary to change this setting.
Export
This section allows to choose a folder in which the files will be saved.
It is also possible to choose the format for the output files from the provided menu. The files are exported by default in .STL, but they can also be exported, for example, in .OBJ if the color information of the scan needs to be preserved.
User Info
In this section the user can provide some general and contact information that we strongly suggest to provide because in case of software error an automated error report will be sent to our support department, and will allow us to contact the user as soon and effectively as possible.
Scanner
This section regulates the scanner hardware settings
Auto Adjust Projector Light
If active, this options allows the software to automatically adjust the light intensity of the projector based on the texture of the inserted impression. It is advised to check this option to guarantee the best possible scanning performances.
Post Acquisition Alignment
This option performs all alignemts on the image after the scanning process is finished; it can be considered as a safety check for possible wrong superpositions of the views of the impression.
Restart Scanner Configuration
This button allows to start over with the First Software Configuration as seen in the previous pages. <br\> This procedure can bu run if the customer wants to recalibrate, set another scanner on the same computer or change the scanning hight.
Advanced Settings
Allows the access to advanced settings


