Difference between revisions of "ExampleIndividual"
(Created page with "{{DISPLAYTITLE:Scanning Individual Impressions|noerror}} <translate> In this page will be followed and explained the wizard for scanning 2 individual impression that can or n...") |
(Marked this version for translation) |
||
| Line 2: | Line 2: | ||
<translate> | <translate> | ||
| + | <!--T:1--> | ||
In this page will be followed and explained the wizard for scanning 2 individual impression that can or not be from the same patient. | In this page will be followed and explained the wizard for scanning 2 individual impression that can or not be from the same patient. | ||
| − | ==Project Definition== | + | ==Project Definition== <!--T:2--> |
| + | <!--T:3--> | ||
Launch the scanning software double-clicking on the 1Click icon on your desktop. The Welcome Page will open; to create the project click on the first icon. | Launch the scanning software double-clicking on the 1Click icon on your desktop. The Welcome Page will open; to create the project click on the first icon. | ||
| + | <!--T:4--> | ||
[[File:Start.PG]] | [[File:Start.PG]] | ||
| + | <!--T:5--> | ||
For detailed information on how to define a project visit the specific page: [[Proj_Def|Project Definition]]. | For detailed information on how to define a project visit the specific page: [[Proj_Def|Project Definition]]. | ||
| + | <!--T:6--> | ||
In this example we are going to scan two individual impressions; here is the definition of our demo project: | In this example we are going to scan two individual impressions; here is the definition of our demo project: | ||
| + | <!--T:7--> | ||
[[File:Individual-Definition.png]] | [[File:Individual-Definition.png]] | ||
| + | <!--T:8--> | ||
Take particular care in choosing the correct Workflow, since it will generate the scanning wizard. | Take particular care in choosing the correct Workflow, since it will generate the scanning wizard. | ||
| − | ==Step 1: Scan the Lower impression== | + | ==Step 1: Scan the Lower impression== <!--T:9--> |
| + | <!--T:10--> | ||
The first step of this project is scanning the lower impression. | The first step of this project is scanning the lower impression. | ||
| + | <!--T:11--> | ||
[[File:Individual-Scan1.png]] | [[File:Individual-Scan1.png]] | ||
| + | <!--T:12--> | ||
Insert the impression in the scanner's holder and click on the first available icon; choose the strategy the item need to be scanned with and wait for the image to be completed. | Insert the impression in the scanner's holder and click on the first available icon; choose the strategy the item need to be scanned with and wait for the image to be completed. | ||
| + | <!--T:13--> | ||
For more information on the scanning interface visit the page [[Wizard|Wizard]]. | For more information on the scanning interface visit the page [[Wizard|Wizard]]. | ||
| + | <!--T:14--> | ||
If the scanned image presents missing information, it is possible to take one or multiple additional scans to cover the missing areas. <br/> To do so, rotate the 3D view of the impression so that the missing information can be easily seen in the monitor and just click on the '''Add Image''' button {{Inline button|AddImage.PNG}}. The scanner will position the impression in the same position of the 3D view and it will take an individual image of that position. | If the scanned image presents missing information, it is possible to take one or multiple additional scans to cover the missing areas. <br/> To do so, rotate the 3D view of the impression so that the missing information can be easily seen in the monitor and just click on the '''Add Image''' button {{Inline button|AddImage.PNG}}. The scanner will position the impression in the same position of the 3D view and it will take an individual image of that position. | ||
| + | <!--T:15--> | ||
[[File:Individual-Integration.png]] | [[File:Individual-Integration.png]] | ||
| + | <!--T:16--> | ||
Now that all the missing information has been filled out, continue with the project clicking on the '''Next''' button {{Inline button|Next.PNG}}. | Now that all the missing information has been filled out, continue with the project clicking on the '''Next''' button {{Inline button|Next.PNG}}. | ||
| + | <!--T:17--> | ||
[[File:Individual-next.png]] | [[File:Individual-next.png]] | ||
| − | ==Step 2: Scan the Upper impression== | + | ==Step 2: Scan the Upper impression== <!--T:18--> |
| + | <!--T:19--> | ||
Insert the upper impression in the scanner and proceed as before. | Insert the upper impression in the scanner and proceed as before. | ||
| + | <!--T:20--> | ||
[[File:Individual-Scan2.png]] | [[File:Individual-Scan2.png]] | ||
| + | <!--T:21--> | ||
Should be there need to add images, proceed as explained before. <br />Once satisfied with the result, click on the '''End''' button {{Inline button|End.PNG}} to open the Export and Upload dialog. | Should be there need to add images, proceed as explained before. <br />Once satisfied with the result, click on the '''End''' button {{Inline button|End.PNG}} to open the Export and Upload dialog. | ||
| − | ==Step 3: Export and Upload== | + | ==Step 3: Export and Upload== <!--T:22--> |
| + | <!--T:23--> | ||
The dialog for export and upload will open automatically. | The dialog for export and upload will open automatically. | ||
| + | <!--T:24--> | ||
[[File:Individual-export.png]] | [[File:Individual-export.png]] | ||
| + | <!--T:25--> | ||
Choose the partner you want to send the file to and check the project information then click on the upload button {{Inline button|UploadIcon.PNG}} to Export. | Choose the partner you want to send the file to and check the project information then click on the upload button {{Inline button|UploadIcon.PNG}} to Export. | ||
| + | <!--T:26--> | ||
The Dental Uploader will open automatically and, when the file is 100% processed, will show the positive model of the scanned impression. <br />Since two impressions were scanned it will be possible to choose which file to visualize. | The Dental Uploader will open automatically and, when the file is 100% processed, will show the positive model of the scanned impression. <br />Since two impressions were scanned it will be possible to choose which file to visualize. | ||
| + | <!--T:27--> | ||
[[File:Individual-Uploader.png]] | [[File:Individual-Uploader.png]] | ||
| + | <!--T:28--> | ||
For more information on the Export and Upload dialog visit the [[Upload|Upload]] page. | For more information on the Export and Upload dialog visit the [[Upload|Upload]] page. | ||
</translate> | </translate> | ||
{{Navigation|Project Examples|ExampleTriple}} | {{Navigation|Project Examples|ExampleTriple}} | ||
Revision as of 09:22, 18 December 2017
In this page will be followed and explained the wizard for scanning 2 individual impression that can or not be from the same patient.
Contents
Project Definition
Launch the scanning software double-clicking on the 1Click icon on your desktop. The Welcome Page will open; to create the project click on the first icon.
For detailed information on how to define a project visit the specific page: Project Definition.
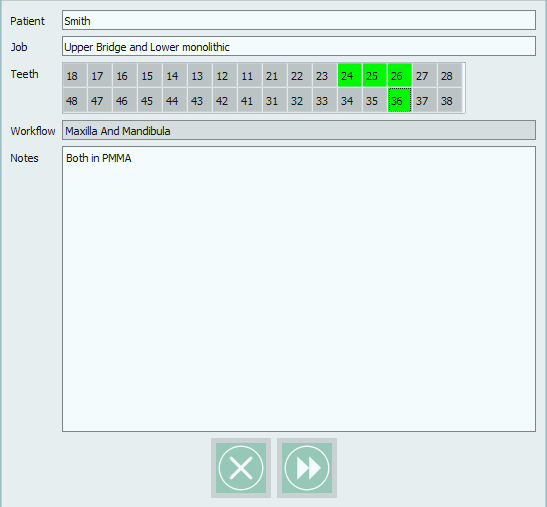
In this example we are going to scan two individual impressions; here is the definition of our demo project:
Take particular care in choosing the correct Workflow, since it will generate the scanning wizard.
Step 1: Scan the Lower impression
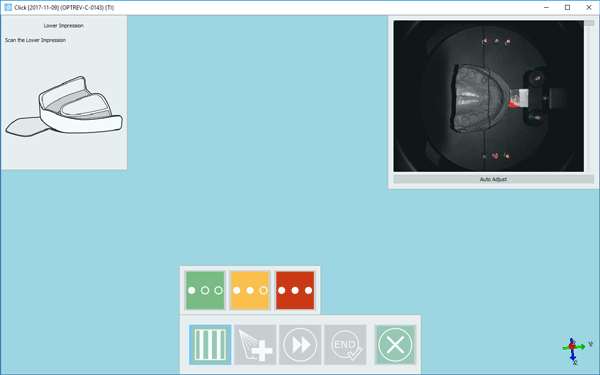
The first step of this project is scanning the lower impression.
Insert the impression in the scanner's holder and click on the first available icon; choose the strategy the item need to be scanned with and wait for the image to be completed.
For more information on the scanning interface visit the page Wizard.
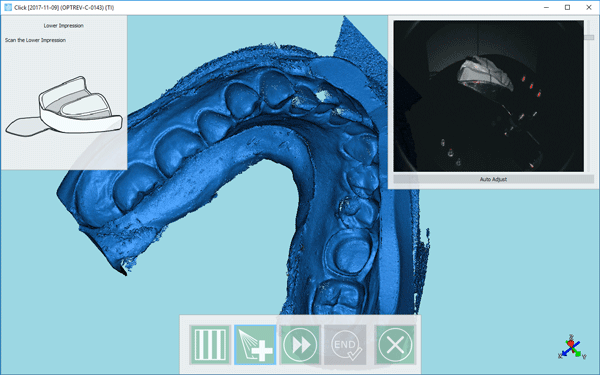
If the scanned image presents missing information, it is possible to take one or multiple additional scans to cover the missing areas.
To do so, rotate the 3D view of the impression so that the missing information can be easily seen in the monitor and just click on the Add Image button . The scanner will position the impression in the same position of the 3D view and it will take an individual image of that position.
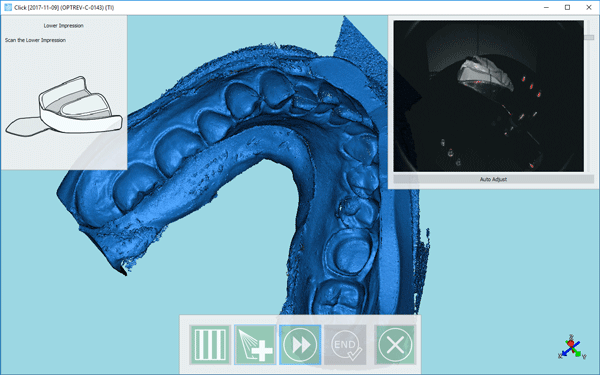
Now that all the missing information has been filled out, continue with the project clicking on the Next button .
Step 2: Scan the Upper impression
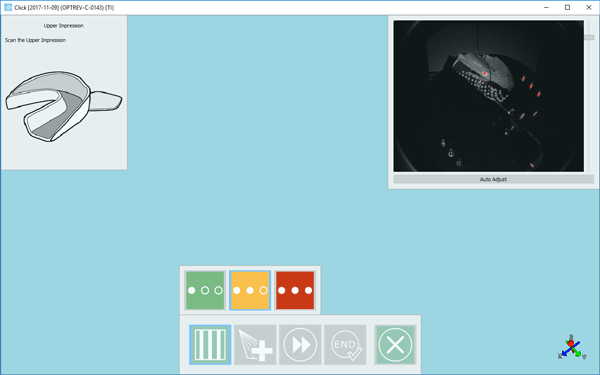
Insert the upper impression in the scanner and proceed as before.
Should be there need to add images, proceed as explained before.
Once satisfied with the result, click on the End button to open the Export and Upload dialog.
Step 3: Export and Upload
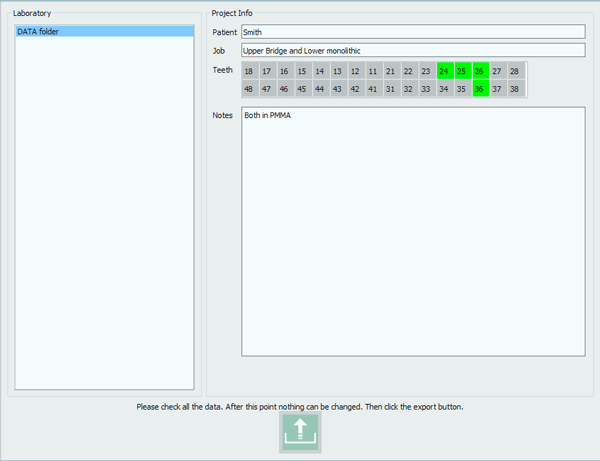
The dialog for export and upload will open automatically.
Choose the partner you want to send the file to and check the project information then click on the upload button to Export.
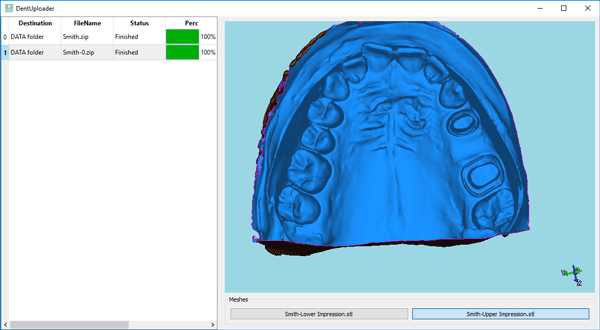
The Dental Uploader will open automatically and, when the file is 100% processed, will show the positive model of the scanned impression.
Since two impressions were scanned it will be possible to choose which file to visualize.
For more information on the Export and Upload dialog visit the Upload page.
